
Part three of my review of
Office 2013 introduces you to some of the changes in one of the most used
Office applications – Word.
Microsoft Word 2013
The new Design tab
The Ribbon is still there, but
there’s a new tab – Design. The Design tab
is where you’ll find options to format your entire document. Some of the functions on the Design tab you’ll
already be familiar with – themes, styles and colours. There are new document formatting styles to
choose from and a preview feature so you can see how the style you've chosen
will look on your entire document before you apply it.

Layout options
 Instead of using the tools on
the ribbon to format a picture, Word 2013 brings the tools to you. Select a picture, chart, or SmartArt object,
and a small icon appears at the top right corner of the object. Click on the icon and the new Layout Options box
appears giving you options for text wrapping and placement. Select ‘See more’ to open the full Layout
dialog box where you’ll find more options for positioning your object.
Instead of using the tools on
the ribbon to format a picture, Word 2013 brings the tools to you. Select a picture, chart, or SmartArt object,
and a small icon appears at the top right corner of the object. Click on the icon and the new Layout Options box
appears giving you options for text wrapping and placement. Select ‘See more’ to open the full Layout
dialog box where you’ll find more options for positioning your object. Alignment Guides
The Alignment Guides show you
when a picture, chart, or SmartArt object is lined up with another object on your
page. When you move your object on your
page the alignment guides will automatically appear to show you when they are
lined up with other elements. Align your
picture to your heading; align a chart to the top of a paragraph or to the right
margin; perfectly align two pictures next to each other.
Work with PDFs inside Word
This is my favourite of the
new Word features. In older versions of
Word you could save a document as a PDF, but you couldn't edit a PDF unless you
first converted it to Word format. With Word
2013 you can open PDF files and edit and complete them in Word. You can edit data inside tables in the PDF
and move images around the document.
When you've finished editing you can save the document as either a PDF
or a Word file.
Working with Tables
There are a few new features
for working with tables. Inserting rows and
columns is easy – move your mouse to the left edge where you want your new row and
a small icon will appear – click on the icon and the new row will be
inserted. Inserting columns works the
same way. When you select part or all of
a table a Mini Toolbar appears with options for deleting rows, columns or the
entire table.
To change the appearance of
your tables you can now choose a preset border style or select your line style,
weight and pen colour and paint your border using the new Border Painter tool.

Working with long documents
 If you’re working on a long
document Word 2013 allows you to collapse and expand it, so you see only the part
of the document you are working on. You
need to format your document using the built in styles – Heading 1, Heading 2,
etc. Change to Print Layout View, hover
your mouse next to the heading and a small triangle appears. Click this triangle and all the text between
that heading and the next will be hidden, with just the headings visible.
If you’re working on a long
document Word 2013 allows you to collapse and expand it, so you see only the part
of the document you are working on. You
need to format your document using the built in styles – Heading 1, Heading 2,
etc. Change to Print Layout View, hover
your mouse next to the heading and a small triangle appears. Click this triangle and all the text between
that heading and the next will be hidden, with just the headings visible.
You can also right-click a
heading to access the Expand/Collapse option, which gives you menu control for
this feature.
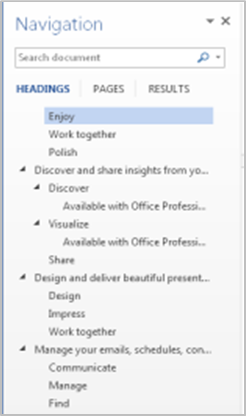
Another handy feature for
working with long documents is a navigation pane where you can move through the
document, and click on the heading of the part you want to get to.
Part four of my review of Office 2013 will be about the new Excel
features.
No comments:
Post a Comment