Have you upgraded to Windows 10? Depending on which version of Windows you came from, it could be a very big change for you.
I've put together a list of articles and tips to help you get to know your new operating system. If you have any questions about Windows 10 let me know in the comments below this post, or on my Facebook Page.

Showing posts with label Software. Show all posts
Showing posts with label Software. Show all posts
16 September 2015

12 June 2014
New How-To Guide - Microsoft PowerPoint 2010
Have you
ever explored this blog? There’s more to
it than just this page. Take a look at
the Guides and eBooks page – that’s where to look if you’re after step-by-step
instructions on how to use techie tools and software. There are two eBooks on there at the moment –
Gmail Basics, and the new one – Microsoft PowerPoint 2010.

This new
guide is suitable for anyone using PowerPoint 2007 through to 2013. There are slight differences between the
three versions (2007, 2010 and 2013), but mostly to do with the number of
picture editing options, designs, transitions and animations. The basics are the same for all versions.
At the moment these guides are FREE for you to download by clicking on the title.
04 June 2014
Trend Micro's 'What's Your Story' competition
 This week
is Stay Smart Online Week, an Australia-wide initiative to educate Australians
on how to best protect themselves online.
The theme this year is security on mobile devices – On The Go. Our
phones and tablets are becoming a normal part of our lives – we rely on them for
so many tasks while we’re out and about.
But it seems that almost every day we hear of the risks to our children
when they’re online, but what about the benefits to our children of living in a
connected world?
This week
is Stay Smart Online Week, an Australia-wide initiative to educate Australians
on how to best protect themselves online.
The theme this year is security on mobile devices – On The Go. Our
phones and tablets are becoming a normal part of our lives – we rely on them for
so many tasks while we’re out and about.
But it seems that almost every day we hear of the risks to our children
when they’re online, but what about the benefits to our children of living in a
connected world?
To coincide
with Stay Smart Online Week, Trend
Micro, a leader in
internet security, has launched the What’s Your Story competition, aimed at encouraging
children to share their positive experiences about using mobile devices and the
internet.
Children
aged 8-12 can enter by creating a poster, and those aged 13-18 years create a two
minute video, with the theme:
What do you enjoy doing On The Go
on your mobile device and how do you do it safely? Include any advice you can offer others too.
The
competition will run until 13 July and there’s the chance to win iPads or iPad-Minis
and more. Entries can be submitted on
this site from 16 June. Your kids could
even enter as a school or classroom.
Make sure you read all the conditions before your children start
creating their entries. Once the entries
start rolling in the video entries can be viewed here and your child can vote
for their favourites.
One of the
ways you can keep your children safe when they are using their phones or
tablets is with mobile security software.
Trend Micro’s Mobile Security software provides advanced protection and
privacy for Android and iOS devices by guarding against identity theft and
viruses, blocking dangerous websites, protecting their privacy on social media,
and more.

To
celebrate Stay Safe Online Week and the What’s Your Story competition, Trend
Micro would like to give one of my lovely readers Trend Mobile Security
software.
To enter, I’d
like to hear about the positives to your children of living in an online world –
how kids use their mobile devices and the benefits they bring (eg. organising, school, communication). Entries can be from you or from your children (just make sure you include your name in the entry if it's your kids entering)
Giveaway Terms & Conditions
- Submit your entry in a comment at the bottom of this post.
- Add a comment below a Facebook post about this competition letting me know you have entered
- Like Techie Mum on Facebook here – if you don’t already
- This competition is open to Australian Residents only
- The competition is open for one week – from 4 June to 16 June 2014
- All entries have an equal chance of winning – this is a game of chance
- The winner will be announced on Wednesday 18 June 2014 on the Techie Mum blog, Facebook page, and Twitter
- The winner will be contacted via the blog or by email address where one has been provided
- The winner has four days to reply, otherwise the prize will be redrawn.
05 April 2014
Goodbye Windows XP

In October 2001 Windows XP was released and over the
years it has become the most used computer operating system in the world. In
the 12 years since there have been three new versions of Windows released - Vista,
7, and 8/8.1, but there are hundreds of millions of computers all over the
world still using XP – actually 18% of Windows PCs.
If you’re one of them, you should spend this
weekend thinking about what you’re going to do after Tuesday – because on 8
April Microsoft will cease to support Windows XP. While XP is still a great operating system
there could be some problems if you continue to use it after that date.
Hopefully I can answer your questions about what it
means to you:
What will happen on 8 April 2014?
On that date Microsoft will no longer offer any
kind of technical support for Windows XP.
That means there will be no more automatic updates from Microsoft – of
most concern is no more security updates.
Support is also ending for Internet Explorer 8,
which is the default web browser for XP.
Without those security updates your computer could
be exposed to malware, viruses and other security threats.
Will my computer still work?
Yes, the end of Microsoft support will have no
effect how your computer works.
Should I buy a new computer?
If you've been thinking about it, then yes. Now would be a good time to buy.
If you've been hearing terrible things about
Windows 8, then let me reassure you that it’s not that bad, it’s very fast, and
if you bypass the modern tiled start screen there’s a familiar XP/Windows 7
style desktop. It has also been rumoured
this week that a future update will reintroduce the Start Menu.
Most of the software that you used on your XP
computer (unless it’s very old) will still work on Windows 8, or this could be
a good opportunity to negotiate with the salesman when buying your new computer
to see what software they can throw in - a one year subscription to Office 365 would
be good!
To help you move your files from your XP computer to
a new one, Microsoft has a free tool – PC Mover Express. This tool will copy
your files, music, videos, email, user profiles and settings from your old PC
to your new computer running Windows 7, 8 or 8.1.
If I don’t want to buy a new computer what can I do?
- Use a more modern web browser – like Google Chrome, or Mozilla Firefox. They are both free to download and will be supported on XP computers until at least 2015. This will help to stop your computer being exposed to the most common threats.
- Keep your internet security software up to date.
- If your computer is suitable you could install a new operating system on it - you can still buy Windows 7 installation disks. To check if your computer can run Windows 7 download the Windows 7 Upgrade Advisor.
If I buy a new computer is there anything I can do with my XP computer?
Yes, you’ll have no problems at all if you are not
connected to the internet, so maybe keep it as a backup computer or for the
kids for games or basic programs.
Have a think this weekend about what you're going to do if you still have an XP computer and if you have any specific questions pop them in a comment below.
01 April 2014
Techie Mum How-To Guides
Something I've wanted to provide my Techie Mum readers for a while now are guides to performing certain techie tasks, how to use particular software, and to help
you learn more about your techie devices.
To
coincide with the 10th anniversary of the launch of Gmail my first
Techie Mum How-To Guide is now available.
You can download my Gmail Basics guide from the Guides & ebooks page
on the blog.

I'll be adding more guides regularly. Topics
that will be added very soon are Outlook Contacts and PowerPoint for Images.
If there is a topic you would like to know more about just leave me a message. I'd also love to hear what you think of my guides.
28 March 2014
Microsoft Office now on iPad!
Today
the iPad got a lot closer to being able to replace a computer. This morning Microsoft released Office for
iPad. That’s right, finally the missing
link in the ability to use any device for your Word, Excel and PowerPoint
docs.
Office
for iPad comes as three separate free apps - Word, Excel and PowerPoint. These are the same Word, Excel and PowerPoint
you know and use on your computer, and although they have been built
specifically for the iPad with some differences, you’ll be able to start using them
immediately with very little to learn.
What you need to know
You
need a subscription to Office 365 to be able to create and edit documents. Without the subscription you’ll only be able
to open and view existing documents.
Office
365 is Microsoft’s different option of purchasing Office. Rather than buying the software and
installing it on your computer, you pay a yearly subscription – around $100 for
five computers (PC and/or Mac) and five iPad or Windows tablets). The subscription also includes 20GB of storage per user (up to five users in one household) on OneDrive (Microsoft’s cloud storage), which, if you use it, means your
documents are accessible from any device.
I wrote about Office 365 here.
 |
| Save to OneDrive or to your iPad |
When
you’re logged in to your Microsoft account and you save to OneDrive, your
documents are accessible and synced across all your devices. There doesn't appear to be any delay in
syncing – which does happen on some applications I use. I started typing this post on my PC, as soon
as I first saved it, it was on Word on my iPad within 20 seconds. Of course you can also save your documents to
your iPad, instead of OneDrive, and once installed the Office apps are added to
the Open With options on your iPad when you want to open a document you've received via email.

As
these apps have been designed specifically for a smaller touch-based device
there have been some changes:
The
Ribbon is not the same as Office on your computer, but you do have all the
basic, and quite a lot of not-so basic, tools you need – in fact, for all but
the more advanced users, it has everything you need.
 |
| Word for iPad Ribbon |
 |
| PowerPoint for iPad Ribbon |
You're not stuck with just creating basic documents on the iPad - there's a great choice of templates.
 |
| Just some of the PowerPoint for iPad templates |
Depending
on the app and what you’re doing you may have a custom keyboard – especially with
Excel, when a numeric keyboard is needed.
Speaking
of keyboards – if you attach a Bluetooth keyboard to your iPad you can use most
of your familiar keyboard shortcuts.
One
problem with Office on the iPad is that you can’t print directly from the iPad. Hopefully the ability to use AirPrint will be
something that’s added in the near future.
I've been working today only on Word and PowerPoint on my iPad, and so far the only
thing I haven’t been able to do is to crop a photo in PowerPoint – I had to go
back and do it in Photos. I will still
be using Office on my computer when I'm in the office, but when I'm out I’ll finally be able to get some real work done
without having to carry my laptop with me.
Using OneDrive I know that any new documents I create, or existing ones
I edit, will be there on my computer when I get back to my office.
13 March 2014
Canva - great design simplified

Have you seen Canva yet?
Canva
is a free web-based design tool that is bringing the ability to create
beautiful images and designs to everyone.
No design experience necessary – Canva is really easy to use.

Simply
choose what you’d like to create – an image for your Facebook page or a Facebook
cover, a card, a poster, a document, an invitation or just about anything else
you can think of. There are templates
already set up or you can create your own from scratch.


Once you’ve chosen your background you can drag-and-drop different
elements onto your design from Canva’s library of more than one million photos,
graphics and fonts. Most elements are
free, but if you use a premium item it only costs $1.
Even if you use Canva’s templates you can still customise them by changing
the colours and fonts; upload your own photos to use; and move elements
around.
Once you’re happy with your design,
you can choose to download it as an image or as a PDF, or share it immediately to Facebook or Twitter.
Canva
was released towards the end of 2013 and since then I've used it to create almost every image on Techie Mum – Facebook cover and tabs, a media kit, blog header, logo, my app reviews, as well as most of the images on my posts and on social media.
But
the first thing I used it for was nothing to do with Techie Mum. At the end of last year I was struggling with
a job I’d taken on for my eldest son’s Year 6 Graduation. I was putting together a memento for each
child using photos from Kindergarten to Year 6.
A Year Book was just too expensive so I had decided on an individual
collage for each child. I tried so many
different software options and I just wasn't happy with any of them. Then, as so often happens, when I was at my
lowest and just didn't think these collages would ever get done, Canva was
released! Back then it was by invitation
only, and I managed by get one of those invitations! Within an hour of ‘playing’ on Canva I had
found the solution. Canva has over 100
different photo collage templates! I
think I screamed when I saw this –

The photos of each child were uploaded to Canva, the colours and font were changed to match our school's colours and with
three other lovely Mums we created 50 photo collages in under two weeks – A3
size – which we then laminated. This is
how they turned out –

Canva
regularly adds new elements – more layouts and design features, and they've just added photo filters so you can have fun with your own photos, or Canva’s, before
adding them to your Canva creations.
If
you need a little help Canva adds new design tutorials regularly. There’s no invitation needed now – just pop
over here and sign up NOW!
24 October 2013
OS X Mavericks - a new operating system for your Mac
Yesterday I wrote about the new
iPad and iPad mini that Apple just introduced (if you missed it pop over here). There’s more than just new iPads coming –
Apple also has something new for the Mac users too.
A new operating system - OS X Mavericks
What’s new?
- Improved battery life, with your idle apps put ‘to sleep’ so they don’t drain power
- Multiple Finder tabs – similar to your internet browser. You can now consolidate multiple finder windows into one.

- You can ‘Tag’ your files now to make it easier to find related files. Great for keeping track of multiple files for one project - tag your Keynote presentation, your Pages report and the list you created in Numbers – click their tag name in the Finder sidebar and all three files will appear together in one Finder window.
- You can now access iBooks across all your devices, so if you buy a book on your iPad it will automatically appear on your Mac. Also, if you’re copying text from iBooks to a Pages document, a citation will be added for you (great for students and researchers)
- No more remembering passwords - iCloud Keychain stores, encrypts and automatically enters your usernames and passwords across all your devices
- Apple Maps
- A new look Calendar that can provide maps to your appointments and estimate the travelling time (as long as you've activated location services)
- With Airplay you can set up an Apple TV or a standard TV as a secondary monitor
- Safari has had a makeover too, it’s much faster and there are new safeguards against malicious tracking sites
- Notifications now has Quick Reply for Mail and Messages, which means you can reply directly from the alert – no need to go to the app.
OS X Mavericks is available now for
your post-2007 Apple desktop and laptop.
It’s free from the App Store, as long as you’re running OS X Snow
Leopard or later. If you’re still
running Leopard, you’ll need to upgrade to Snow Leopard first, and you’ll have
to pay $20.99 for that upgrade.
27 September 2013
iOS7 Tips
I
have been posting tips on iOS7 all week on Facebook. These posts have generated a lot of comment
and have been very popular. I’ve
collected them all here together in case you missed any of them, and added a
few new ones too…..

Do you have to upgrade to iOS7?
Not yet - you can easily wait a few days or even weeks. There are sure to be a few small updates over the next week or so to iron out some minor annoyances - there's already been one update. However, it's not something you can avoid altogether - some applications are going to start requiring the new operating system.Free ebooks on iOS7
Have you upgraded
to iOS7? Are you still working out the changes? Or have you just bought your
first iPhone or iPad and you're not sure how it works? iTunes has FREE iOS7
guides that you can download and read in iBooks:
iPhone: http://bit.ly/1eyPbh6
iPad: http://bit.ly/16pf4qz
iPod Touch: http://bit.ly/1byI0Va
iPhone: http://bit.ly/1eyPbh6
iPad: http://bit.ly/16pf4qz
iPod Touch: http://bit.ly/1byI0Va
App Auto-Update
iOS 7 will now
update your apps in the background whenever you are connected to a Wi-Fi (or
mobile) network; without letting you know there are any updates. While this does
mean your apps will always be up to date, it also consumes data and power, and
should be restricted for when you're free to plug in your iPhone or iPad to
charge, or when you can connect to your home Wi-Fi.
You can turn off auto-update: Tap the Settings icon, scroll down to iTunes & App Store and turn off Automatic Downloads for Apps and Updates.
You can turn off auto-update: Tap the Settings icon, scroll down to iTunes & App Store and turn off Automatic Downloads for Apps and Updates.
Moving wallpaper
If you slowly
jiggle your iPhone or iPad you may notice the "parallax" effect of
three-dimensional icons sitting on top of your wallpaper. This effect uses
internal hardware to sense the direction, speed, and motion of your movements.
You might like this effect (or not), but it does drain the battery, and it is
there just for appearance.
To save a bit more power on your device you can disable the "moving wallpaper" feature: head to Settings > General > Accessibility > Reduce Motion, then flick the switch in the on position.
To save a bit more power on your device you can disable the "moving wallpaper" feature: head to Settings > General > Accessibility > Reduce Motion, then flick the switch in the on position.
iOS7 battery saving tip – Background App Refresh
Apps that receive
constant updates, usually those that are syncing across a number of devices,
are automatically refreshed in the background in iOS7 so they are always up to
date – rather than receiving an update when you
open that app. However this feature is very heavy on your precious battery
power and it has been reported as causing some issues with logging users out of
sessions on some apps so they have to log back in.
I think that’s two good reasons to disable it: Just go to Settings > General > Background App Refresh. You can then see which of your apps are using this feature – in my case it’s Evernote, Google Maps, Pocket and Springpad. You then have the choice of disabling Background App Refresh on an app by app basis, or disabling it all together.
Don’t worry, your apps will still be updated – it will just happen when you open that app, which is how it was in iOS6.
I think that’s two good reasons to disable it: Just go to Settings > General > Background App Refresh. You can then see which of your apps are using this feature – in my case it’s Evernote, Google Maps, Pocket and Springpad. You then have the choice of disabling Background App Refresh on an app by app basis, or disabling it all together.
Don’t worry, your apps will still be updated – it will just happen when you open that app, which is how it was in iOS6.

Turn off AirDrop except when needed
iOS7 Tip of the day: AirDrop is a brilliant tool that allows you
to share files between devices when they are in close proximity. But its use
can take a heavy toll on your battery, particularly when AirDrop is always
trying to ‘discover’ if there are any friends close by.
To save your battery, you can just
activate AirDrop when you need it. To
turn it off, swipe up from your home screen to bring up the Control Centre,
then tap AirDrop. Select Off when you're not using it. This is also where you choose who can
'discover' you using AirDrop.

Don't use moving 'dynamic' wallpapers
The new dynamic wallpapers do look great, especially when they
move when you move your device. However,
they are another drain on your battery power.
Would you rather have bubbles floating around on your screen or have
your battery last longer? Instead go for
a ‘still’ wallpaper – and there are some new ones to choose from in iOS7 – or use
one of your own pictures. Go to Settings > Wallpapers & Brightness > Choose Wallpaper > select Stills and select
your background (or Camera Roll or My Photo Stream to select your own photo).
Switch off Wi-Fi and Bluetooth when you don‘t need them
If you are not near or not using a Wi-Fi hotspot, or sending
items to other devices using Bluetooth, these can be turned off. Swipe up from your home screen and you’ll see the Control
Centre, tap the Wi-Fi button and the Bluetooth button to off.
Close any apps you’re not using
Double-press
the Home button and all your open apps will appear as a scrolling banner
across your screen. To close one, just
swipe it up. Press the Home button again
to return to normal.
15 April 2013
Microsoft Office 2013 Review - Part 4 Excel
Just like the new version of
Word, Excel opens with a Start Screen, where you can start a new blank
workbook, create a new spreadsheet based on a template, and open an existing
Excel file. At first glance Excel 2013
looks the same as 2010, just with some slight cosmetic changes to the
Ribbon. What is hidden is that Excel is
now even easier to use with lots of intuitive tools – here’s just a few of them….

Charts
In previous versions of Excel you had to decide which
chart you wanted and switch between each before you found the right one. Excel 2013 has a great new feature for those
who are a bit confused by all the different styles of charts – Recommended
Charts. Just select the data for the
chart and click Insert > Recommended Chart to see the different options that would
suit your data. Click each chart to
preview what your data will look like in that style. Once you've chosen your preferred chart, small
icons will appear outside the top right corner when you select it, giving you
access to tools for working with the chart’s elements, styles, and colours.

One workbook – one window
In Excel 2013 each
workbook opens in its own window, which makes it much easier if you often work on
two or more workbooks at the same time.
Quick analysis
If you’re not sure what’s
the best way to display your data so that it shows what you want, Quick
Analysis should help you decide. Just
select the cells that contain the data you want to work with, then click the
Quick Analysis button that appears next to your selected data. Depending on the type of data, you’ll be
given a choice of different options for displaying that data. Would you like to display your data as a
chart or a table; would you like to change the format to show colours; the top
or bottom 10%? Just select the option
you want, or point to it and you’ll see a preview.
Pivot Tables
If you've ever struggled with Pivot Tables, Excel 2013 makes it so much
easier with Recommended Pivot Tables. Just select your headings and data, then Insert > Recommended
Pivot Tables. You’ll be shown a series of Pivot Tables with
explanations of what they show. You just need to select the table that shows
what you want to see, click OK, and your Pivot Table
is automatically drawn for you.
Did you miss the other reviews in this series? Just click these links to read:
07 March 2013
Microsoft Office 2013 review - Part 3
Part three of my review of
Office 2013 introduces you to some of the changes in one of the most used
Office applications – Word.
Microsoft Word 2013
The new Design tab
The Ribbon is still there, but
there’s a new tab – Design. The Design tab
is where you’ll find options to format your entire document. Some of the functions on the Design tab you’ll
already be familiar with – themes, styles and colours. There are new document formatting styles to
choose from and a preview feature so you can see how the style you've chosen
will look on your entire document before you apply it.

Layout options
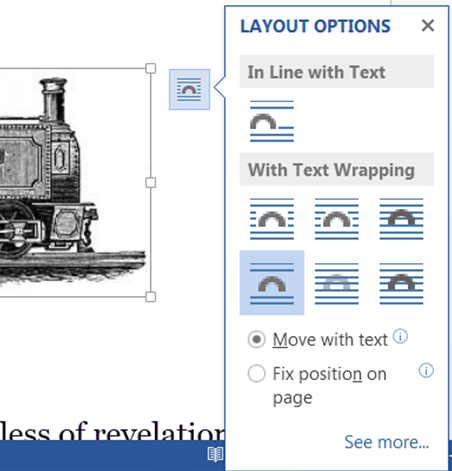 Instead of using the tools on
the ribbon to format a picture, Word 2013 brings the tools to you. Select a picture, chart, or SmartArt object,
and a small icon appears at the top right corner of the object. Click on the icon and the new Layout Options box
appears giving you options for text wrapping and placement. Select ‘See more’ to open the full Layout
dialog box where you’ll find more options for positioning your object.
Instead of using the tools on
the ribbon to format a picture, Word 2013 brings the tools to you. Select a picture, chart, or SmartArt object,
and a small icon appears at the top right corner of the object. Click on the icon and the new Layout Options box
appears giving you options for text wrapping and placement. Select ‘See more’ to open the full Layout
dialog box where you’ll find more options for positioning your object. Alignment Guides
The Alignment Guides show you
when a picture, chart, or SmartArt object is lined up with another object on your
page. When you move your object on your
page the alignment guides will automatically appear to show you when they are
lined up with other elements. Align your
picture to your heading; align a chart to the top of a paragraph or to the right
margin; perfectly align two pictures next to each other.
Work with PDFs inside Word
This is my favourite of the
new Word features. In older versions of
Word you could save a document as a PDF, but you couldn't edit a PDF unless you
first converted it to Word format. With Word
2013 you can open PDF files and edit and complete them in Word. You can edit data inside tables in the PDF
and move images around the document.
When you've finished editing you can save the document as either a PDF
or a Word file.
Working with Tables
There are a few new features
for working with tables. Inserting rows and
columns is easy – move your mouse to the left edge where you want your new row and
a small icon will appear – click on the icon and the new row will be
inserted. Inserting columns works the
same way. When you select part or all of
a table a Mini Toolbar appears with options for deleting rows, columns or the
entire table.
To change the appearance of
your tables you can now choose a preset border style or select your line style,
weight and pen colour and paint your border using the new Border Painter tool.

Working with long documents
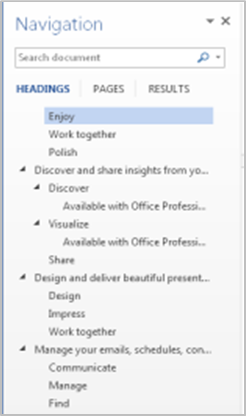 If you’re working on a long
document Word 2013 allows you to collapse and expand it, so you see only the part
of the document you are working on. You
need to format your document using the built in styles – Heading 1, Heading 2,
etc. Change to Print Layout View, hover
your mouse next to the heading and a small triangle appears. Click this triangle and all the text between
that heading and the next will be hidden, with just the headings visible.
If you’re working on a long
document Word 2013 allows you to collapse and expand it, so you see only the part
of the document you are working on. You
need to format your document using the built in styles – Heading 1, Heading 2,
etc. Change to Print Layout View, hover
your mouse next to the heading and a small triangle appears. Click this triangle and all the text between
that heading and the next will be hidden, with just the headings visible.
You can also right-click a
heading to access the Expand/Collapse option, which gives you menu control for
this feature.
Another handy feature for
working with long documents is a navigation pane where you can move through the
document, and click on the heading of the part you want to get to.
Part four of my review of Office 2013 will be about the new Excel
features.
28 February 2013
Microsoft Office 2013 Review - Part 2
Last week I posted about the
new way to buy Office 2013. If you missed
it you can read it here.
Today I'm going to let you
know about the main changes to Office 2013 as against the last version – 2010. The features below are common to all the
Office programs. My next posts will
detail the changes specific to the main three – Word, Excel and PowerPoint.
Start Screens
Previous versions of Office
programs started with a blank document ready to create; in Office 2013 each
program has a colour-coded start screen—blue for Word, green for Excel, orange
for PowerPoint, green for Publisher.
These start screens are where
you can create a blank document, select a template, search online for
templates, search for a document on SkyDrive, or open a recent document.

Working with the Cloud
Office 2013 is designed to work
easily with the cloud—specifically Microsoft’s SkyDrive. If you use SkyDrive, your account details will
appear in the top left corner of each of the program’s screens, as well as on
their start screens. When you save a document, worksheet, or presentation, the default
option is to save to your SkyDrive account, but you can choose to save it to
your computer.

 If you use Dropbox, you’ll be
familiar with using cloud based storage.
SkyDrive works in exactly the same way by creating a ‘virtual’ folder on
your computer just like Dropbox. The big
benefit with SkyDrive over Dropbox is the amount of storage. A standard account with SkyDrive gives you
7GB of free storage. When you subscribe
to Office 365 you get an extra 20GB.
If you use Dropbox, you’ll be
familiar with using cloud based storage.
SkyDrive works in exactly the same way by creating a ‘virtual’ folder on
your computer just like Dropbox. The big
benefit with SkyDrive over Dropbox is the amount of storage. A standard account with SkyDrive gives you
7GB of free storage. When you subscribe
to Office 365 you get an extra 20GB.
If you do save your Office
documents on SkyDrive, you’ll be able to access them from any device, via
Office 2013 on a PC or tablet, or via the WebApps. Another great feature if you
are switching between devices, is that Word, Excel and PowerPoint will save the
last location where you were working before you closed the program - down to
the letter, cell, or image. This means you can be editing a document on your
computer at work, and you can open that same document on your tablet or
computer at home, and the exact position you were at will be shown so you can
pick up exactly where you left off.

Work with a touchscreen
Office 2013 gives you the
option of easily switching between using your mouse or a touchscreen. The touch mode spreads the commands out so
that it’s easier to use with your fingers on a touch screen.

Free Trial
If you’d like to try Office
2013 free for one month, click here. At
the end of the month you can continue with a subscription of $12 each month, or
you can just cancel the trial at the end of the month without cost. Also,
the trial won’t affect any earlier versions of Office on your computer.
My next post in this series will
be about the new features of Word, Excel and PowerPoint.
If you’re already using Office
2013, or if you give the trial a go, please leave me a comment on your opinion
of the programs.
Subscribe to:
Posts (Atom)