-->

30 October 2012

Facebook Interest Lists


Have you noticed your Facebook News Feed has been looking a bit emptier than usual?  Are updates from some of your friends and Facebook Pages that you have ‘liked’ not appearing anymore? 

Did you know that you have never received every status update that your friends have posted?  Facebook has made some changes recently that have drastically reduced what we see on our news feed.  But I can help you take back control so that you do see the posts you want.

Facebook's EdgeRank Algorithm

First I’ll explain how Facebook decides what appears on your newsfeed.  Each time one of your friends, or a Facebook Page you have ‘liked’, posts a status update, tags a photo, comments or ‘likes’ another update, it creates what Facebook calls an ‘Edge’ which could appear on your newsfeed.  Because your newsfeed would be swamped if every update, like, or comment from your friends was shown, Facebook created a way (an algorithm) to decide which edges would appear on your newsfeed.  Facebook predicts how interesting each edge would be to you, by looking back at what interaction you have had with that ‘friend’ in the past - how many mutual friends you have, how many times you comment, ‘like’, or share their updates.  Each action has a different value; for instance, commenting is worth more than ‘liking’.  Just reading an update in your newsfeed doesn’t count – you need to actually do something for Facebook to register that you want to interact with that person or page.  How often and how long ago you interacted with them is also taken into account.  Based on these factors (and more), Facebook ranks each edge and that score determines whether it appears on your newsfeed.  Each time you log on to Facebook your newsfeed will display only the highest ranked edges at that time.  If the EdgeRank Algorithm decides that an update is not of any interest to you and so doesn’t score well, you won’t see it.

Why do you need to know about the EdgeRank Algorithm?  By knowing how it works you know that the more you interact with updates from your Facebook friends and Pages, the more likely you are to see their posts in your newsfeed.  That means - Like, Comment, and Share!

Facebook has recently made changes to this EdgeRank Algorithm, which has resulted in a drastic drop off in the number of posts you see on your newsfeed from Facebook Pages you have liked.  You may have blogs that you follow, organisations you belong to, or shopping offers you like to receive each day; and you don’t want these updates disappearing.

You can’t force these posts to always appear in your newsfeed, but there is a way around these changes, so that you still see the posts you want. 

By creating Interest lists, you can group the Pages (and friends too if you like) you follow into different categories.  Some of the most popular posts from those lists will still appear in your newsfeed, but by clicking on the actual list you’ll see all the recent posts from those you’ve included in that list. 

How do you create Interest Lists?


  •     Click on INTERESTS (on the left of your newsfeed)
  •     On the Interests page, click on + Add Interests.
  •     Click Create List.
  •     A selection of Pages you have liked, other people or Pages you have interacted with and other suggestions will appear.  You don't have to 'like' a Page or subscribe to a person to add them to a list.  Click on any of these suggestions to add them to your Interest List, or search for others you might like using the search box at the top of the screen, or by using the categories on the left. 


  • After you've selected all those you want to include in your list, click Next.
  • Type a name for your list.
  • Select a privacy setting for your list.
  • Click Done.


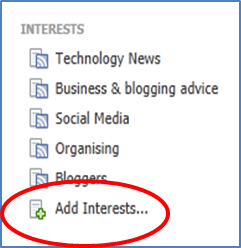
Once you have created one list you can click on Add Interests at the bottom of your Interests lists to create another list.  You can see that I've got lists for Technology News, Business and blogging advice, Social Media, Organising and Bloggers.  I love that I can just go to the list I want and read posts only about a particular topic.


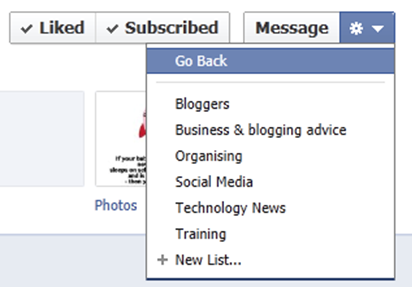
You can also add people or Pages to your existing interest lists from their Facebook Page.  Go to their Facebook Page, select settings (the gear icon), then click on Add to Interest Lists.  This same menu appears when you hover your mouse over their Like button.  Select the appropriate list from those shown and you’re done.  You can even create a new list at this point by selecting the last option + New List…


From now on, when you log on to Facebook, apart from checking your newsfeed, click on each of your Interest Lists to see all the posts in each category.  Just because all the posts are now visible don't forget to still interact with your friends and Pages you follow - Like, Comment and Share!

When I first created my lists I kept forgetting to check them.  Luckily you will occasionally see a summary post from Facebook notifying you of the number of new posts in your Interest lists.


Have you noticed the drop off in posts from your favourite Facebook people and Pages?  Have you set up Interest Lists yet?  If you have, are you remembering to check them? 


24 October 2012

Can a tablet replace your computer?

The recently released MumsNow 'Mums in 2012' survey found that while 80% of mums use a laptop as their primary techie device, 50% of those surveyed had an iPad at the top their wish list.  Could that be because they're wanting to replace their laptop?  

Can a tablet PC replace your computer altogether? It's a question I'm often asked, especially with so many iPad and tablet devotees raving about what they can do.  If that's something you're considering I may be able to help with your decision.

Today I'm posting over at Adventures and Misadventures of a Mummypreneur, one of my favourite blogs, where Amanda provides brilliant advice on managing work and children.

Pop over there now and we'll take a look at what a tablet is good for and what it can and cannot do. 


22 October 2012

App of the week - Flipboard


My new favourite app!  Flipboard collects all the posts by your friends and Pages you like on Facebook, Twitte, Instagram, LinkedIn, Tumblr, Flickr, Google Reader and Google+; new videos on YouTube; as well as RSS feeds from your favourite blogs and sites; and brings them all together for you in a gorgeous looking magazine-like display.  You can also choose to have news from around the world added to your Flipboard magazine too – you just select the topics you’re interested in.


Flipboard is available for iPad, iPhone (from iTunes) and Android (from Google Play), and it’s free.

Once you’ve downloaded Flipboard you set up your accounts:  tap the content guide ribbon, and select from the services available under 'Your Accounts' the select 'Add an Account.'  On Android you select More on your Flipboard Account page, then Accounts, and select the accounts you want to add.

Once you’ve added an account you’ll see a box to tap on your Flipboard Account screen which will take you to all the feeds on that site.  To flip to the next page in your magazine just swipe up from the bottom of the screen. You can share, comment, and like just as you can if you were at that site.  Flipboard can also save articles to Instapaper, Pocket or Readability so you can read them later.

If you have multiple devices and you’d like to access Flipboard on all of them, just download the app to each device, create an account, and it will be synced across all your devices.

I used to use Google Reader to help me keep track of the blogs I follow.  I’ve now switched to Flipboard – I find it so much easier to read as each blog post has its own page. I’ve just added it to my Android phone, but it will be going on all my devices – I love it!

16 October 2012

Google SafeSearch


If you’ve ever searched for images on Google you’ll know how the most innocent search criteria can produce some very strange results, some that there is no way you would want your children to see.  So what can you do to protect them when they’re searching for images for a school project, for instance?
Google SafeSearch can filter what appears when searching on the web, images, and videos. 
 
  • You need to have a Google search on your screen in order to change the settings. On the search results screen click on the Options button and select Search Settings. 


  • On the next screen you can change the settings between Off, Moderate, and Strict.  Drag the slider to Strict to stop all sexually explicit results appearing. 


  • Click on Lock SafeSearch if you think your children might try to change the settings. 
  • You’ll need to sign in to your Google account to activate SafeSearch Lock. 
  • Once it's locked if you need to change the settings you'll need to log back into your Google account again.


This video shows you how to set up SafeSearch for images.  The only difference is that the SafeSearch setting is displayed on the screen when you are viewing images and video search results, but not when you're just searching the web.


11 October 2012

How to make a website - a recommendation for you


Every day I receive a Daily Blog Tips newsletter via email, full of great advice regarding websites and blogging.  I've kept many of those emails and I refer back to them regularly.  Now, Daniel Scocco, the author of Daily Blog Tips, has started a new project.  It's a website devoted to guiding you step-by-step through creating your own website.  It's full of tutorials and brilliant information on everything you need to know about starting your own website, online store or blog.


By following the instructions you can have your own Wordpress site up and running in a matter of hours.  It’s especially for those who have no technical skills and most of the tools the site recommends are free.  Even if you already have a website I guarantee you’ll still find lots of useful tips on this site.  Just as an example, there’s articles on Basic Techniques to Get Backlinks for your website; How to beat writers block; How to promote your website with social media; Four ways to get a logo for your website, and so much more.

If you sign up for site's newsletter you'll also receive a free ebook - 50 Mistakes to avoid when making your website. 

Go and take a look - but watch out – you’ll probably be stuck reading the articles for the next few hours – I was.    www.howtomakeawebsite.net  

You should also take a look at the Daily Blog tips site  www.dailyblogtips.com


09 October 2012

Apps for decorators and renovators


I first discovered blogs when I was trying to get some help with a decorating project in my home.  Finding one blog with gorgeous beach-style homes led me to another, and another, and so on….    To this day I still visit those same blogs because they continue to inspire me in what I want to do in my own home. 

I know many of you are also decorating and renovating homes, so I thought I’d give you a little techie help in that department, with some very handy apps….


Mark on Call (Home Space Planning Design Tool)

This app allows you to map out your rooms with accurate dimensions, add furniture, flooring, and try out different paint colours and fabrics by taking photos of finishes you like and adding them as a ‘skin’ to the appropriate item.  One of the best features of this app is being able to drag your furniture around the room to see how it looks, and whether it fits, before you do it in real life!

Available for iPhone, iPod Touch, iPad
$1.99


Photo Measures

You’ve just found the most gorgeous lounge, but you don’t know if it will fit through your door, or you’re not sure if the fridge will fit in your kitchen?  This app allows you to take a photo of a room or an object and write measurements on the photo.  So you’ll always have the measurements you need with you.

Available for iPhone, iPod Touch, iPad
$4.99


For Android devices there’s a similar app called My Measures for $4.99. (Don’t get the free ‘lite’ version – it’s not as good as the full version)


iHandy Level Free

Don’t have a spirit level?  Whether you’re hanging pictures, or checking if your door frame is square, grab your phone.  You can use it as a level in landscape, portrait or face-up. 

Available for iPhone, iPod Touch, iPad, Android
FREE


Home Maintenance 

Do you always forget when to change the air conditioning filters, or when your pest inspection is due?  This app allows you to set reminders for these tasks and also gives suggestions for when certain regular maintenance tasks should be done.  You can email yourself a complete record of maintenance and add pictures to keep a record of your home and repairs.

Available for iPhone, iPod Touch, iPad
$5.49


For Android devices try House Maintenance Schedule, a calendar based app where you log routine maintenance tasks and set a reminder date.  You can view a month-by-month guide to what needs to be done, half-yearly, and annual tasks.  

Free for the basic version, $2.01 for Pro


Dulux MyColour

If you find a colour you absolutely love, simply snap a picture of it and Dulux’s free ‘MyColour’ app will match it to their closest paint colour.

Available for iPhone, iPod Touch, iPad
Free


Palettes

A great app for choosing colour schemes.  Palettes allows you to pick colours from pictures in magazines, websites, and in photos and see what colours contrast or match.

Available for iPhone, iPod touch and iPad
Free for the basic version or $6.49 for Palettes Pro


CliqCliq Colors

Take photos of your rooms with your iPhone and this app will convert the colours into RGB, HSB and CMYK.  You can then see how your colours will pair with other colours.

Available for iPhone, iPod Touch, iPad, and Android
$2.99


Paint Tester Pro

Another app that allows you to test paint colours on your phone before you actually paint the walls.  Upload a photo of a well lit room, then use the paint bucket tool to paint the walls in your chosen colour.  You can even take a photo of a colour you like and use that the ‘paint’ the photo of your room.

Available for iPhone, iPod Touch, iPad and Android
$1.99


Quick Paint Calculator

Enter the width, length and wall height of your room, add the number of windows and doors and the calculator will tell you how much paint you need (litre or gallons).  You can create a separate calculation for each room and save it, so you can then add different rooms together to get the total amount of paint you need, that is, if you’re painting them the same colour.

Available for Android
Free


Carpet, Floor Calculator

This app will calculate the amount of materials needed for particular jobs, based on your input of the dimensions of the job.  You can use it to calculate how many border tiles you need, how many rolls of wallpaper, how much carpet, even how much mulch!  You can add the cost per metre (or feet/yards) and the app calculates the total for you.  Projects can be saved and the calculations can be emailed to you.

Available for iPhone, iPod Touch, iPad, Android
Free for iOS, $0.99 for Android


I.D. Wood

I.D. Wood is your pocket guide to over 160 different kinds of wood from all around the world, their durability, common uses, nail size details, and sustainability.

Available for iPhone, iPod Touch and iPad
$5.49


All the iOs apps are available from the iTunes store; all Android apps from Google Play.


04 October 2012

How to get more life from your MacBook battery


On Monday I posted tips for maximising the life of your Windows laptop battery.  Today it’s the turn of the MacBook users.
 

There are quite a few settings you can change to get more life from your battery in general, or if you need to get every last minute out of it when you’re trying to finish a job with no available power point.  The following tips apply to MacBook, MacBook Pro and MacBook Air.


Dim your screen

The one setting that will have the greatest impact on battery life is the brightness of the screen.  Pressing F1 dims your screen – lower the brightness until it is still comfortable to view.  As an example, you can increase the battery life of a MacBook Pro by up to three hours just by taking the screen brightness to the middle setting.


Select Energy Saver options

Your Energy Saver options will vary depending on the type of MacBook you have and the operating system.  You access these settings from System Preferences - select Energy Saver.  You’ll see samples of the Energy Saver panes further down.


Some of the settings you can change here are:
  • Putting the hard disk to sleep when it’s not in use.
  • Slightly dimming the display when using either battery or a power adaptor – you chose which power source in turn and then change the settings for each.
  • Automatically reducing the screen brightness before your notebook goes to sleep.
  • Changing the time after which your notebook or the display goes to sleep – use the slider.


Choose the correct graphics setting

MacBook Pros have two separate graphic processing units – with one being more energy efficient than the other.  If you have an older MacBook Pro (2008 to 2009) you can switch between the two to make your battery last longer.   In the Energy Saver pane select either:


MacBook Pro 2008 - 2009


Better battery life(this is the default setting) – if you are not using graphics-based applications.

Higher performance – if you are playing games, or using applications with a lot of graphics, like iMovie, or iPhoto.   Although, if you’re trying to get every last minute out of your battery these are the applications you shouldn’t be using; they consume much more power.


If you have a MacBook Pro from 2010 or later it will have automatic switching between the graphic processing units.  This means that your MacBook Pro will switch to the best graphic processing unit based on the application you are using.   You can switch this option off if you want the full effect of high-performance graphics-based applications.


MacBook Pro 2010 and later


If you have a MacBook Air from 2010 or MacBook Pro Retina from 2012 you don’t have the option to switch off the auto switching – it is fully automatic.

MacBook Air from 2010 and Macbook Pro Retina from 2012


Take out any disks

The optical drive will spin and read any CDs or DVDs in the drive, which uses battery power.  Remove the disks if you’re not using them.


Disconnect peripherals

Anything attached to your computer can draw power from the battery, even when you’re not using them.  So, disconnect your printer, camera, scanner etc.


Go Offline

If you don’t need to be online, turn off AirPort/Wi-Fi or Bluetooth.
 
To turn off AirPort:
  1. From the menu bar click the AirPort icon 
  2. From the drop-down menu, select Turn AirPort Off.


To turn off Bluetooth:
  1. From the menu bar click the Bluetooth icon .
  2. From the drop-down menu, select Turn Bluetooth Off.


Apple’s batteries will give you considerably more time than a Windows PC’s battery, but by implementing some of the tips above you’ll get even more time out of your MacBook.


02 October 2012

How to get more life from your laptop's battery


Laptops are indispensable these days, but their downfall is their battery life.  You can start each day with a fully charged battery, but it doesn’t take too long before its capacity starts to diminish.

There are plenty of things you can do to prolong the charge in your battery.  Some of these tips you might like to put to use regularly to get the most from your battery – others you might like to keep in mind when you’re trying to eke out every last second before your screen goes black!

Today's post is for Windows laptops - later in the week I'll post details for the Macbook users.

WINDOWS LAPTOPS


Change the Power Option settings

From the Control Panel, select Hardware and Sound, then Power Options if you use Category view, or select Power Options if you use Icon view.

There are a few changes you can make in this window to save some power.


Change how Windows looks

Graphics can really use up battery power.  In the Search box at the bottom of the Start Menu search for Performance and choose Adjust the appearance and performance of Windows.  Choose Adjust for best performance in the next window.  This will remove all the 3D Windows effects, so it will make Windows look a lot less exciting, but it will save a lot of power.  Click Apply once you’ve changed the settings.


Take out any disks

Windows will spin and read any CDs or DVDs in the drive, which uses battery power.  Remove the disks if you’re not using them.

Disable your wireless adaptor

If you don’t need to be online, turn off your wireless adaptor.  Just disconnecting doesn’t do the job – your laptop keeps looking for available networks and this is a very power hungry job.  Disabling your wireless adaptor is usually done with the function keys (check your computer’s user manual – usually in your All Programs list).  My Acer uses <Fn> + < F3> to toggle between off and on.

Go Basic

Turn off all the Windows 7 graphics and make your laptop look like it’s back at Windows 2000.  Right-click on the desktop and select Personalise.  Under Themes, choose Windows Classic.

Disconnect USB peripherals  

USB drives and a wireless mouse use your battery power to run.  So don’t leave that USB stick connected if you’re not using it.  Removing the mouse might be a bit of a problem if you don’t like the touchpad, but maybe you could switch to a cabled mouse instead.

Turn down the sound

Unless you’re listing to music (which you probably shouldn’t be if you’re trying to make your battery last), or watching a video (again – why?) you don’t need your speakers on.  Mute your speakers and save some a little more power.

If you use even some of these tips you’ll gain more battery time, which can make all the difference when you’re desperate to finish a job and there’s no power point around.